Discounts for End Users
The Insert Affiliate platform allows you to provide automatic discounts and trial offers to users who discover your app through affiliate links or short codes. This creates a seamless experience where users automatically receive promotional pricing without needing to manually enter discount codes.
How It Works
When someone clicks an affiliate link or enters a short code that's linked to an offer (configured in your Insert Affiliate Dashboard), the SDK automatically fills our SDK's OfferCode variable with the appropriate modifier that you have associated with this affiliate, (such as _oneWeekFree).
You can then append this modifier to your regular product ID to load the correct promotional version of your subscription or in-app purchase, for which you have set up Promotional offers or Intro Offers
Example Flow:
- Affiliate shares link:
https://your-app.com/affiliate/ABC123(this affiliate has a "one week free" offer modifier associated through our dashboard) - User opens app: SDK detects the affiliate offer and sets
OfferCode = "_oneWeekFree" - User Navigates to Purchase screen: Instead of loading
"monthlySubscription", your app checks if our SDK is storing a modifier from an affiliate and appends this to the base offer - resulting in the purchase loading"monthlySubscription_oneWeekFree" - User sees discount: Automatic promotional pricing without manual code entry
Google Play Console Configuration (Required if supporting Android)
There are multiple ways you can configure your products in Google Play Console:
-
Multiple Products Approach: Create both a base and a promotional product:
- Base product:
oneMonthSubscription - Promo product:
oneMonthSubscription-oneweekfree
- Base product:
-
Single Product with Multiple Base Plans: Create one product with multiple base plans, one with an offer attached
-
Developer Triggered Offers: Have one base product and apply the offer through developer-triggered offers
-
Base Product with Intro Offers: Have one base product that includes an introductory offer
Any of these approaches are suitable and work with the SDK. The important part is that your product naming follows the pattern where the offer code modifier can be appended to identify the promotional version.
If using the Multiple Products Approach:
- Ensure both products are activated and available for purchase.
- Generate a release to at least Internal Testing to make the products available in your current app build
App Store Connect Configuration (Required if supporting iOS)
Make sure you create the corresponding subscription products in App Store Connect:
- Base subscription: i.e.
oneMonthSubscription - Promotional variants:
oneMonthSubscription_oneWeekFree,oneMonthSubscription_threeMonthsFree, etc.

Click to view full size
Insert Affiliate Setup Instructions
- Go to your Insert Affiliate dashboard at app.insertaffiliate.com/affiliates
- Select the affiliate you want to configure
- Click "View" to access the affiliate's settings
- Assign an iOS IAP Modifier to the affiliate (e.g.,
_oneWeekFree,_threeMonthsFree) - Save the settings
Once configured, when users click that affiliate's links or enter their short codes, your app will automatically receive the modifier and can load the appropriate discounted product.
RevenueCat Configuration (Required if using RevenueCat)
If you're using RevenueCat for in-app purchase management, we recommend using RevenueCat Targeting to automatically show different offerings based on affiliate offer codes.
Option 1: RevenueCat Targeting (Recommended)
RevenueCat Targeting lets you automatically show different offerings based on user attributes — no manual product ID construction needed.
How It Works:
- When a user clicks an affiliate link, the SDK sets the
affiliateOfferCodeattribute in RevenueCat - RevenueCat's targeting rules detect this attribute and automatically switch to the appropriate offering
- Your app simply displays
offerings.current— RevenueCat handles the rest
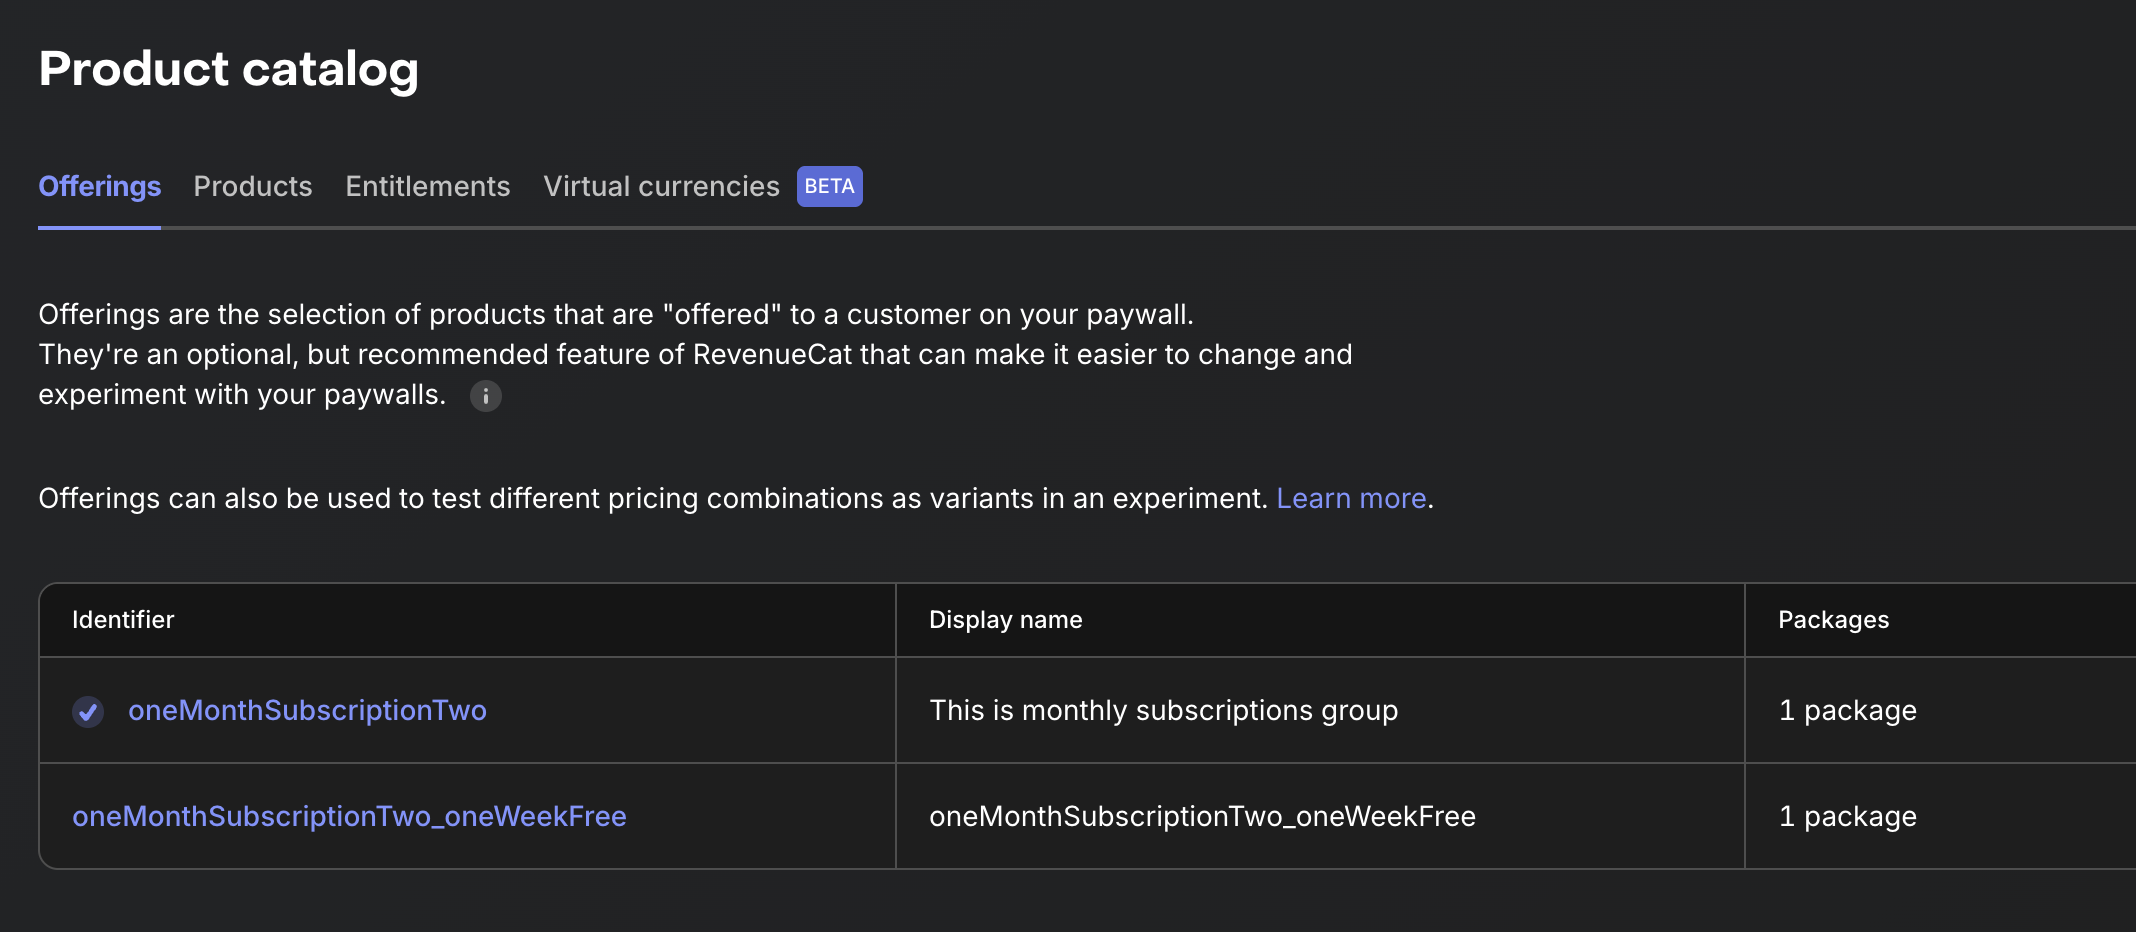
Step 1: Create Offerings in RevenueCat
- Go to your RevenueCat Dashboard → Products → Offerings
- Create your base offering (e.g.,
default) with standard products - Create promotional offerings (e.g.,
oneWeekFree) with discounted products
Step 2: Configure Targeting Rules
- Go to Project Settings → Targeting
- Create a new rule:
- Name: e.g., "Insert Affiliate - One Week Free"
- Condition:
affiliateOfferCodeis any ofoneWeekFree - Show Offering: Select your promotional offering
- Save and publish
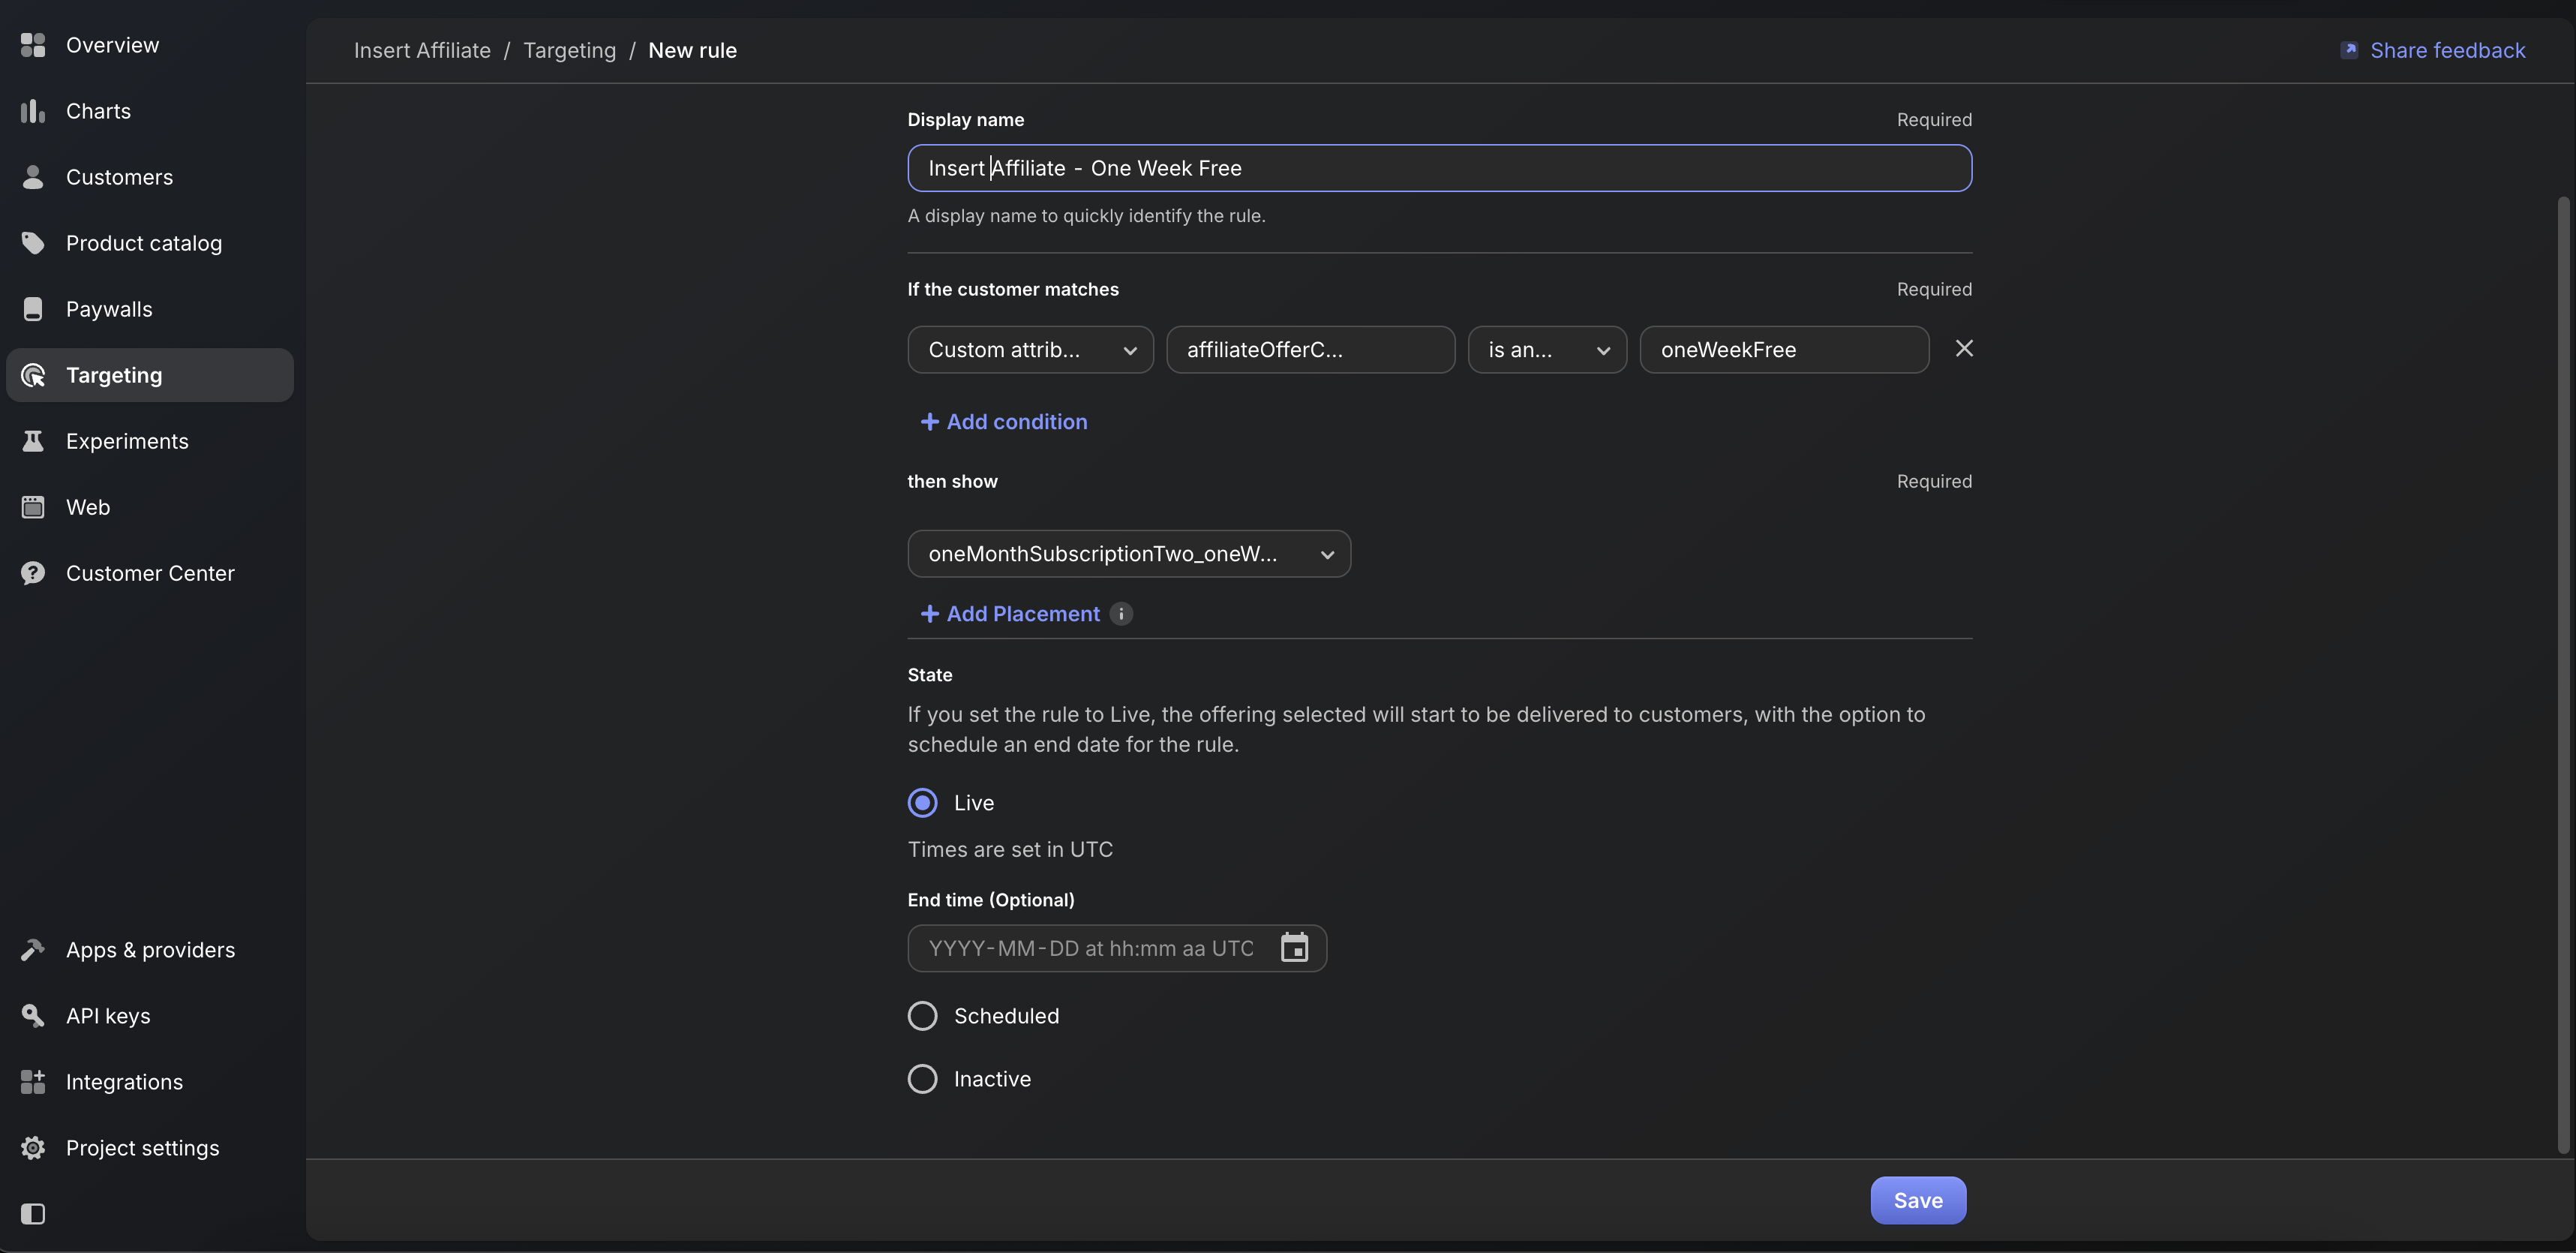
Click to view full size
Step 3: SDK Integration
The Insert Affiliate SDK automatically sets the affiliateOfferCode attribute when configured correctly. See the RevenueCat Setup Guide for the full callback setup.
In your app, simply use RevenueCat's current offering:
// Swift
Purchases.shared.getOfferings { offerings, error in
    if let current = offerings?.current {
        // Display current.availablePackages
        // RevenueCat targeting automatically shows the right offering
    }
}
// React Native
const offerings = await Purchases.getOfferings();
if (offerings.current) {
    // Display offerings.current.availablePackages
    // RevenueCat targeting automatically shows the right offering
}
Option 2: Manual Product ID Construction (Alternative)
If you prefer not to use RevenueCat Targeting, you can manually construct product IDs by appending the offer code modifier.
Products Catalogue Setup:
- Base products: Create your standard subscription products (e.g.,
monthlySubscription,yearlySubscription) - Promotional variants: For each affiliate modifier you plan to use, create corresponding products in RevenueCat:
monthlySubscription_oneWeekFreemonthlySubscription_threeMonthsFreeyearlySubscription_oneWeekFree- etc.
Click to view full size
Important Notes:
- The product IDs in RevenueCat must exactly match the naming convention:
{baseProductId}{modifier} - Each promotional variant should be configured with the appropriate pricing/trial period
- Ensure these products are also properly configured in App Store Connect/Google Play Console
- The modifier system works seamlessly with RevenueCat's existing promotional offer and introductory pricing features
For detailed RevenueCat integration steps, see our RevenueCat Setup Guide.
Required Code
Examples of code, implementation and additional requirements are detailed within the repositories under the relevant section.
iOS Setup
1. Install Required Packages and Complete Setup
To install the Insert Affiliate Swift SDK, follow the instructions on our GitHub repository.
All code changes required are described in detail with examples within the Github Repository.
Specific code changes required by Insert Affiliate for the Discounts for End Users setup can be found here.
React Native Setup
1. Install Required Packages and Complete Setup
To install the Insert Affiliate React Native SDK, follow the instructions on our GitHub repository.
All code changes required are described in detail with examples within the Github Repository.
Specific code changes required by Insert Affiliate for the Discounts for End Users setup can be found here.
Flutter Setup
1. Install Required Packages and Complete Setup
To install the Insert Affiliate Flutter SDK, follow the instructions on our GitHub repository.
All code changes required are described in detail with examples within the Github Repository.
Specific code changes required by Insert Affiliate for the Discounts for End Users setup can be found here.
Unity Setup
1. Install Required Packages and Complete Setup
To install the Insert Affiliate Unity SDK, follow the instructions on our GitHub repository.
All code changes required are described in detail with examples within the Github Repository.
Specific code changes required by Insert Affiliate for the Discounts for End Users setup can be found here.
Stripe / Web Payments Setup
For web-based purchases using Stripe, you can automatically apply coupon or promo codes to checkout sessions when a user arrives via an affiliate link.
How It Works (Stripe)
- Configure Stripe Coupon: Create a coupon or promotion code in your Stripe Dashboard
- Assign to Affiliate: In your Insert Affiliate dashboard, assign the Stripe coupon code to an affiliate (company-wide default or per-affiliate override)
- Retrieve at Checkout: Use the SDK to retrieve the coupon code and apply it to your Stripe checkout session
Insert Affiliate Dashboard Setup
- Go to your Insert Affiliate dashboard at app.insertaffiliate.com/settings
- Find the "Default Stripe Coupon/Promo Code (Company-Wide)" field
- Enter your Stripe coupon code (e.g.,
SUMMER2024,AFFILIATE10OFF) - Save the settings
To override the company default for specific affiliates:
- Go to app.insertaffiliate.com/affiliates
- Select the affiliate and click "View"
- Set a custom Stripe Coupon/Promo Code for that affiliate
- Save the settings
JavaScript SDK Usage
Use the Insert Affiliate JavaScript SDK to retrieve the Stripe coupon code:
import { InsertAffiliate } from 'insert-affiliate-js-sdk';

// Initialize the SDK
await InsertAffiliate.initialize('YOUR_COMPANY_CODE');

// Get the Stripe coupon code for the current affiliate
const stripeCoupon = await InsertAffiliate.getStripeCouponCode();

// Or use the more explicit method with platform parameter
const stripeCoupon = await InsertAffiliate.getOfferCode('stripe');

if (stripeCoupon) {
  // Apply the coupon to your Stripe checkout
  // Example using Stripe.js:
  const session = await stripe.checkout.sessions.create({
    // ... your checkout config
    discounts: [{
      coupon: stripeCoupon,
    }],
  });
}
Example Integration with Stripe Checkout
// On your checkout page
const affiliateId = await InsertAffiliate.returnInsertAffiliateIdentifier();
const stripeCoupon = await InsertAffiliate.getStripeCouponCode();

// Create checkout session with the coupon
const response = await fetch('/create-checkout-session', {
  method: 'POST',
  headers: { 'Content-Type': 'application/json' },
  body: JSON.stringify({
    priceId: 'price_xxx',
    coupon: stripeCoupon, // Will be null if no affiliate coupon
    affiliateId: affiliateId,
  }),
});