
What are Insert Links
Insert Links are our in-house generated links that your affiliates share with end users to download your app. These intelligent links automatically detect whether the user is on iOS or Android, and whether they already have the app installed. This is what’s known as a deferred deep link.
- If the user already has the app installed, the link will take them straight into the correct place inside the app, attributing future sales to your affiliate.
- If the user doesn't yet have the app, the link first sends them to the App Store or Google Play to download it — and then, once they open the app for the first time, it remembers which affiliate referred them and continues tracking future sales through our SDKs.
Setting up Insert Links
1. One-Time Dashboard Setup
Go to the Insert Affiliate Dashboard settings and fill in:
- Website Link (your main website or landing page)
If you have an iOS app, also add:
- iOS App Store Link
- iOS URL Scheme (press "Generate" if you don't yet have one)
- iOS Bundle Identifier (Xcode → Project → Targets → General → Bundle Identifier)
- Apple Team ID (found at developer.apple.com/account → Membership details → Team ID) — required for Universal Links
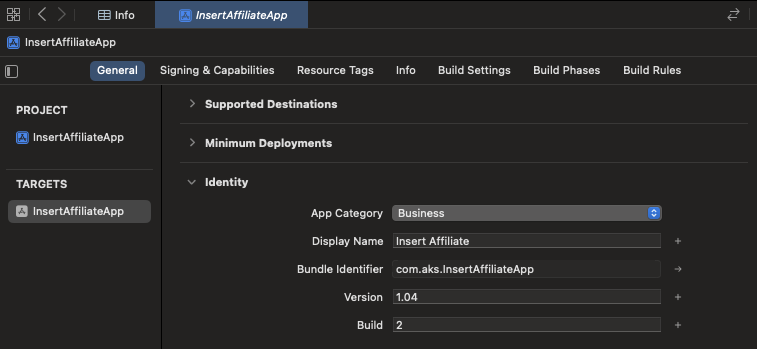
If you have an Android app:
- Google Play Store Link
- Android Bundle Identifier (applicationId in app/build.gradle → defaultConfig → applicationId)
Press Save.
2. iOS Setup
Required for all code stacks: Swift, Objective-C, React Native, Flutter, Unity, Capacitor — this step is native and universal.
2.1 Custom URL scheme (minimum viable deep link)
Add your iOS URL scheme and bundle identifier to Info.plist:
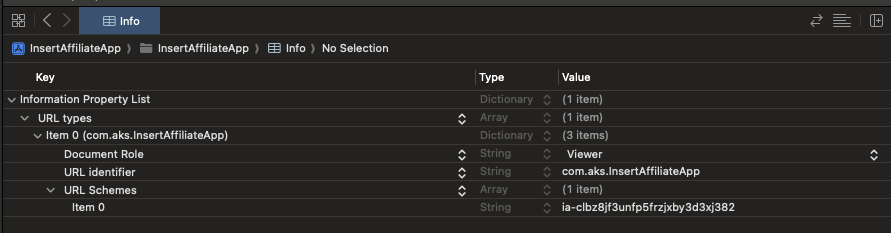
<!-- Info.plist -->
<key>CFBundleURLTypes</key>
<array>
  <dict>
    <key>CFBundleURLName</key>
    <string>com.yourcompany.yourapp</string> <!-- Your bundle identifier -->
    <key>CFBundleURLSchemes</key>
    <array>
      <string>yourapp</string> <!-- iOS URL Scheme from the Insert Affiliate dashboard -->
    </array>
  </dict>
</array>
For Expo managed workflow: You don't edit Info.plist directly. Instead, add the scheme to your app.json:
{
  "expo": {
    "scheme": "yourapp"
  }
}
Expo automatically configures Info.plist when you run npx expo prebuild or npx expo run:ios. Then skip to 2.3 Code Updates.
2.2 Add URL Types in Xcode
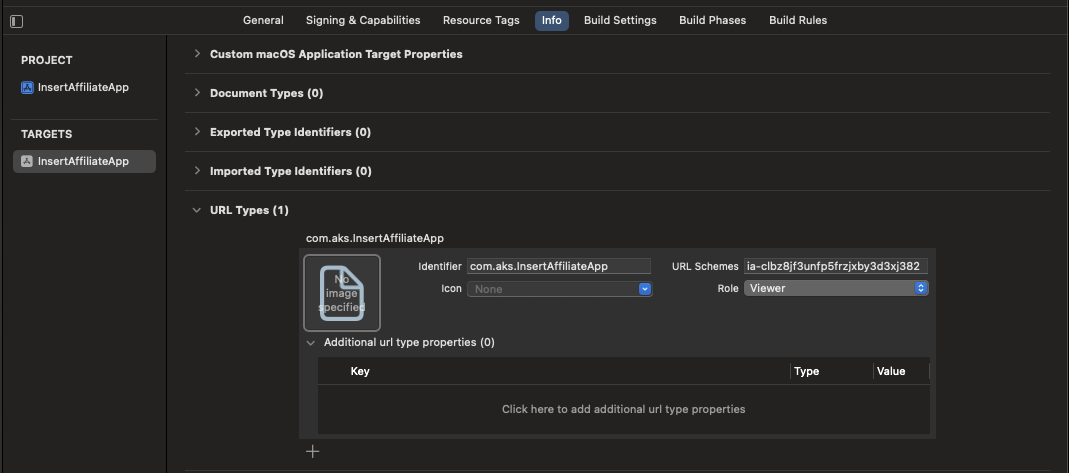
Go to Xcode → Project → Info → URL Types → + (Add)
- Identifier → enter your iOS Bundle Identifier (from the dashboard).
- URL Schemes → enter your iOS URL Scheme (generated in the dashboard).
This ensures iOS can recognise your app when a link with your scheme is opened.
2.3 Universal Links (Optional, Recommended)
Universal Links provide a smoother experience than custom URL schemes. When a user taps an Insert Link and already has your app installed, iOS opens the app directly — without loading the browser first and without showing a "Safari cannot open the page" error if something goes wrong.
If the app is not installed, the link simply opens in Safari and shows the landing page with your App Store download button — no error dialogs.
Step 1: Add your Apple Team ID in the dashboard
In the Insert Affiliate Dashboard Settings, scroll to the Deep Linking Platform section and find the field labelled "Apple Team ID". Enter your 10-character Team ID here.
To find your Team ID:
- Go to developer.apple.com/account
- Look under Membership details
- Copy the Team ID (a 10-character alphanumeric string, e.g.
A1B2C3D4E5)
The "iOS Bundle Identifier" field should already be filled in from Step 1. Both fields are required for Universal Links to work.
Step 2: Add Associated Domains in Xcode
In Xcode, go to your app target → Signing & Capabilities → click + Capability → select Associated Domains.
Add the following entries:
If you're using Insert Affiliate's default domain:
applinks:insertaffiliate.link
If you've set up a custom domain (e.g. links.yourcompany.com):
applinks:links.yourcompany.com
You can add both if you want to support both domains.
Step 3: Handle Universal Links in your app
Your app needs to pass incoming Universal Link URLs to the Insert Affiliate SDK. The setup is different for each platform — see the Universal Links section in your SDK's documentation:
- Swift SDK — Universal Links
- React Native SDK — Universal Links
- Flutter SDK — Universal Links
- Android SDK — App Links
- Unity SDK — Insert Links Setup
2.4 Code Updates
The final change required is different depending on your coding lanage and can be found in the SDK's ReadMe:
- React Native SDK Insert Link Code Changes
- Flutter SDK Insert Link Code Changes
- Swift SDK Insert Link Code Changes
- Android SDK Insert Link Code Changes
- Unity SDK Insert Link Code Changes
3. Android Setup
Required for all stacks (Kotlin, Java, React Native, Flutter, Capacitor).
This step is native and universal.
What you must add
Add two intent-filters to your launcher activity (the activity that opens first, usually MainActivity) in:
- Native (Kotlin/Java):
app/src/main/AndroidManifest.xml - React Native (CLI/Expo prebuild):
android/app/src/main/AndroidManifest.xml - Flutter:
android/app/src/main/AndroidManifest.xml - Capacitor:
android/app/src/main/AndroidManifest.xml
Important: The scheme value you use in the AndroidManifest.xml to replace "REPLACE_WITH_YOUR_SCHEME" must exactly match the Android Bundle Identifier you configured in your Insert Affiliate Settings.
<!-- AndroidManifest.xml -->
<application ...>
  <activity
      android:name="REPLACE_WITH_YOUR_LAUNCHER_ACTIVITY"    <!-- 1. MUST REPLACE: your actual launcher Activity class, i.e. .MainActivity -->
      android:exported="true"
      android:launchMode="singleTop">

      <intent-filter>
          <action android:name="android.intent.action.VIEW" />
          <category android:name="android.intent.category.DEFAULT" />
          <category android:name="android.intent.category.BROWSABLE" />
          <data
            android:scheme="REPLACE_WITH_YOUR_SCHEME"     <!-- 2. MUST REPLACE (e.g. app.example.com) -->
          />
      </intent-filter>
  </activity>
</application>
3.1 Android App Links (Optional, Recommended)
Android App Links provide a smoother experience than custom URL schemes. When a user taps an Insert Link and already has your app installed, Android opens the app directly — without loading the browser or showing a "Choose an app" dialog.
If the app is not installed, the link opens in the browser and shows the landing page with your Google Play download button.
Step 1: Add your SHA-256 fingerprint in the dashboard
In the Insert Affiliate Dashboard Settings, scroll to the Deep Linking Platform section and enter your SHA-256 Certificate Fingerprint.
To find your SHA-256 fingerprint:
# For debug builds
keytool -list -v -keystore ~/.android/debug.keystore -alias androiddebugkey -storepass android -keypass android | grep SHA256

# For release builds (use your keystore)
keytool -list -v -keystore your-release-key.keystore -alias your-alias | grep SHA256
The "Android Bundle Identifier" field should already be filled in from Step 1. Both fields are required for App Links to work.
Step 2: Add App Links intent filter
Add this intent filter to your launcher activity in AndroidManifest.xml, alongside the existing custom URL scheme intent filter:
<intent-filter android:autoVerify="true">
    <action android:name="android.intent.action.VIEW" />
    <category android:name="android.intent.category.DEFAULT" />
    <category android:name="android.intent.category.BROWSABLE" />
    <data android:scheme="https" android:host="insertaffiliate.link" />
</intent-filter>
If you've set up a custom domain, add another intent filter with your domain:
<intent-filter android:autoVerify="true">
    <action android:name="android.intent.action.VIEW" />
    <category android:name="android.intent.category.DEFAULT" />
    <category android:name="android.intent.category.BROWSABLE" />
    <data android:scheme="https" android:host="links.yourcompany.com" />
</intent-filter>
Step 3: Set launch mode
Make sure your launcher activity uses android:launchMode="singleTop" (shown in the manifest example above). This prevents the activity from being recreated when an App Link is tapped while the app is already running.
Step 4: Handle App Links in your app
See the App Links section in your SDK's documentation:
- Android SDK — App Links
- React Native SDK — App Links
- Flutter SDK — App Links
- Unity SDK — Insert Links Setup
Creating Insert Links for Your Affiliates
The process for creating Insert Links depends on how affiliates are added to your programme.
Create Affiliate (Admin)
When creating affiliates one at a time as the company admin:
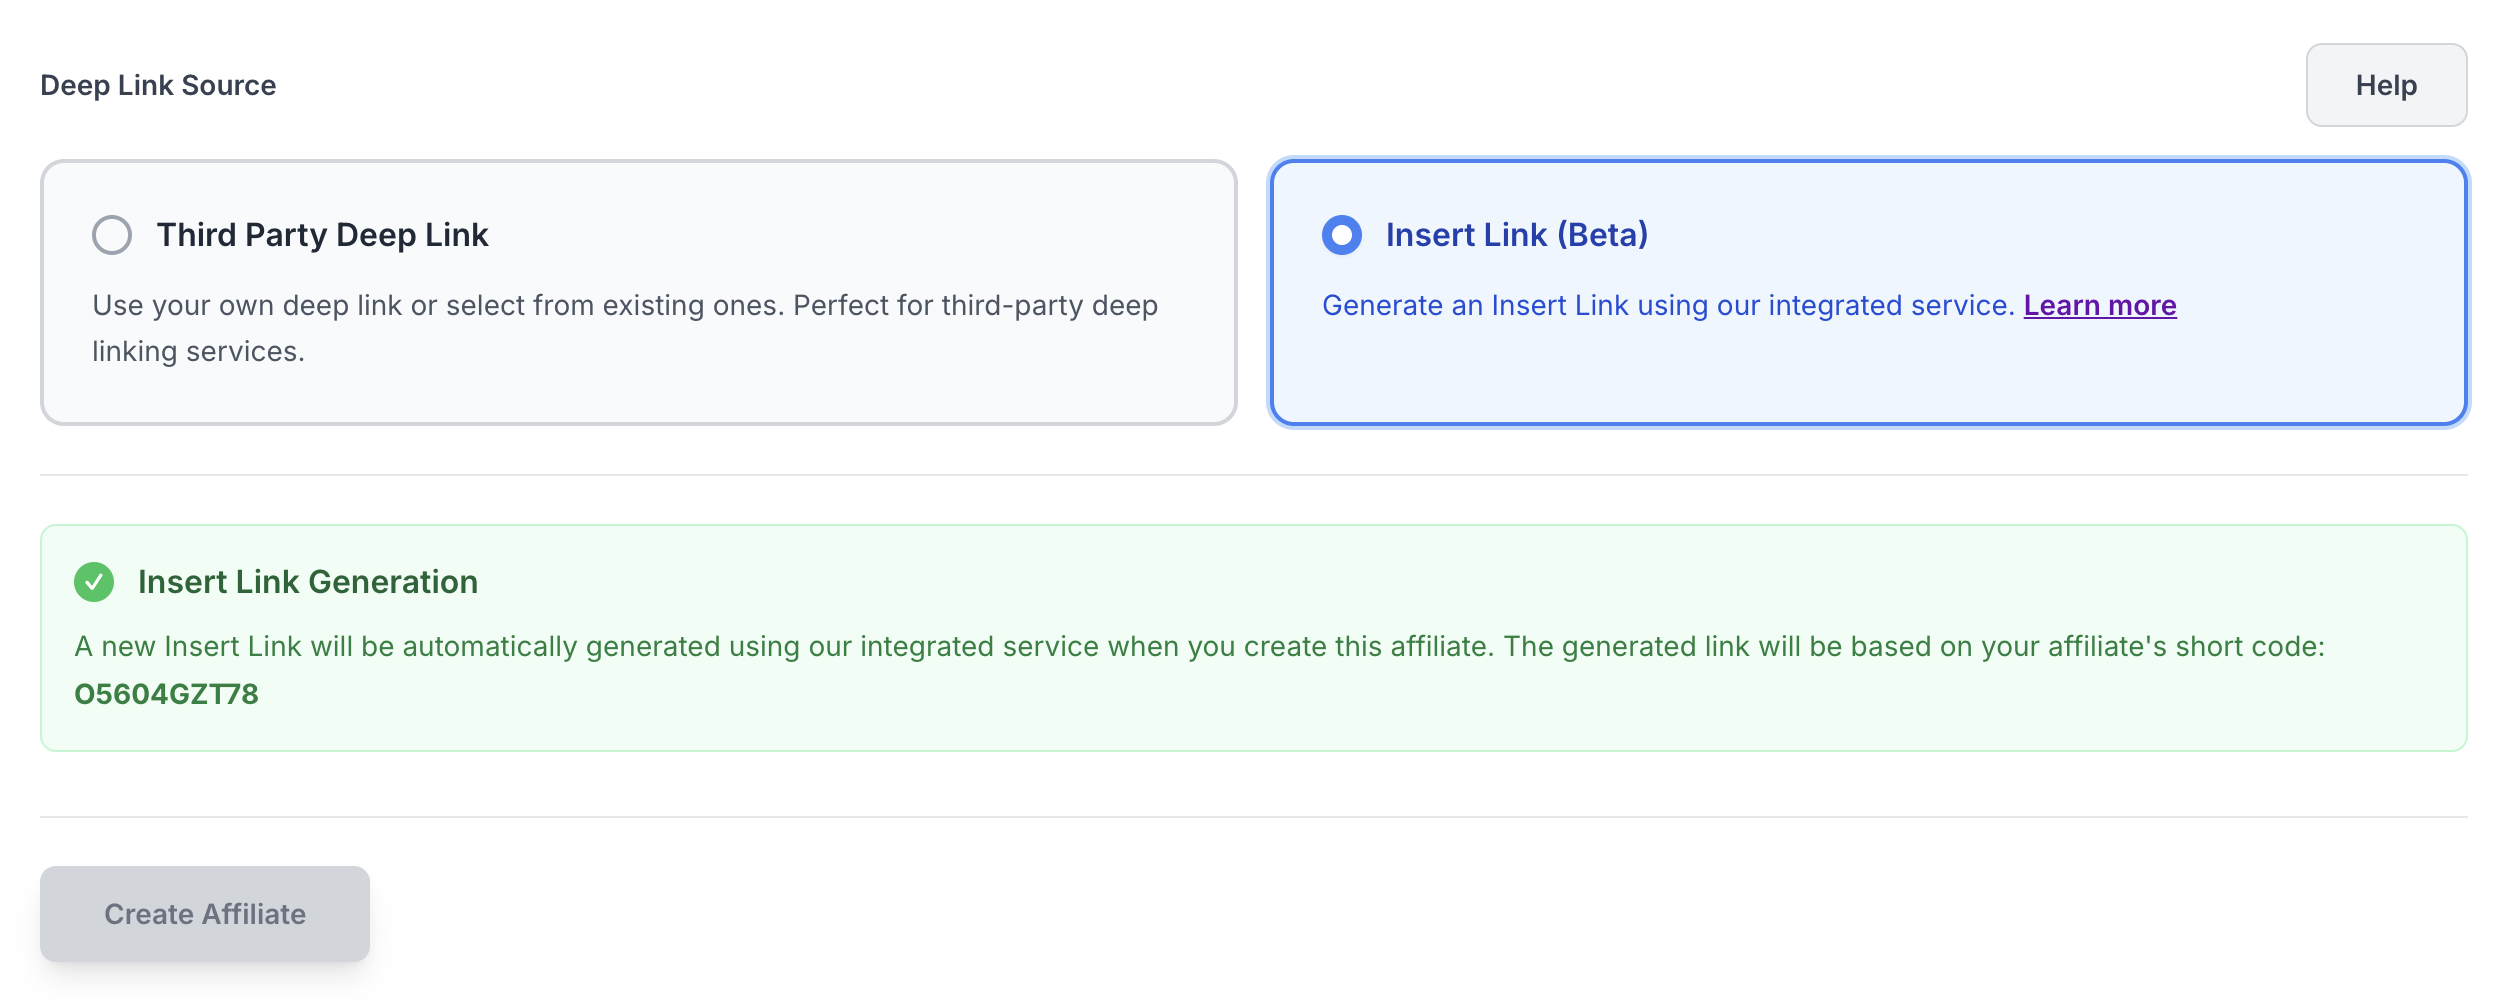
- Complete the form by adding the affiliate’s short code, email, and all other required details.
- Under Deep Link Source, select Insert Link.
An Insert Link will be automatically generated and assigned to the affiliate upon creation.
- The affiliate will receive an email inviting them to the dashboard, where they can find their Insert Link in Settings.
- You will see the affiliate, along with their assigned Insert Link, in the Affiliates section of your dashboard.
Enable Affiliate Self-Signup
When enabling affiliates to self sign up, you can prepare Insert Links in advance for new affiliates:
- Select Insert Link as your deep linking platform.
- Generate an Insert Link.
- Choose the number of affiliate signup slots you want to create.
- Click Create Signup Slots.
- Insert Links will then be automatically generated when affiliates sign up using their chosen affiliate codes.
Custom Domains for Insert Links
Enterprise Feature
Custom domains are available on the Enterprise plan.
Want your affiliate links to use your own branded domain instead of insertaffiliate.link? Enterprise customers can configure a custom domain like links.yourcompany.com for a more professional, on-brand experience.
Benefits of custom domains:
- Brand consistency - Links match your company's domain
- Increased trust - Affiliates and users see your brand, not ours
- Professional appearance - Perfect for enterprise partnerships
Example:
- Default:
https://insertaffiliate.link/abc123/MIKEYB - Custom:
https://links.yourcompany.com/abc123/MIKEYB
For setup instructions, see the Custom Domains Setup Guide.
Social Share Preview for Insert Links
Enterprise Feature
Social share preview customisation is available on the Enterprise plan.
When your affiliates share their Insert Links on social media, messaging apps, or other platforms (WhatsApp, Slack, iMessage, Facebook, Twitter, LinkedIn, etc.), a preview card is shown with an image, title, and description. You can customise how these previews look so they match your brand.
How It Works
By default, Insert Links will use your company name as the title and your dashboard logo as the preview image. If you haven't set a logo, the Insert Affiliate logo is used as a fallback.
You can override any of these defaults in the Social Share Preview settings.
Setting Up Your Social Share Preview
- Go to Settings in your Insert Affiliate dashboard
- Scroll to the Social Share Preview for Insert Links section
- Customise the following:
- Share Image — Upload a PNG, JPG, or WebP image (recommended size: 1200x630px). This is the image shown in link preview cards.
- Title — The headline shown in the preview card. Defaults to your company name if left blank.
- Description — A short description shown below the title. Defaults to "Check out your company name" if left blank.
- Click Save at the bottom of the settings page
The live preview in the settings section shows you how the link will appear when shared.
SVG Images Not Supported
Most social platforms (WhatsApp, Facebook, Twitter, etc.) do not support SVG images for link previews. If your dashboard logo is an SVG, you will see a warning prompting you to upload a PNG, JPG, or WebP image instead.
Fallback Behaviour
If no social share preview settings are configured, Insert Links will fall back in this order:
- Social share preview image (if uploaded)
- Dashboard logo (if set and not an SVG)
- Insert Affiliate default logo
The same fallback logic applies to the title and description fields.